Showing posts with label cake. Show all posts

Thursday, June 9, 2011

Pink Anenome~A crisis

Recently I had an old friend call me up and ask me if I could make a bridal shower cake for her best friend.  Of course I jumped on the opportunity.  She requested my Butter Nut cake with blue frosting and a pink anemone flower accompanied by 12 strawberry cupcakes. 

Quite honestly, I had never made an anemone specifically, though I have made flowers.  I looked forward to the challenge though.  Since it was over two weeks away, I thought I would make it in advance in case I needed practice.  I watched several different video tutorials first.  Then I gathered all my supplies, including a new gum paste mix I had just ordered.  I was really excited to try it out.  Just add water, how nice is that! 
The mix comes in black, red, white, and chocolate.  Isn't that lovely?  I mixed it up per the instructions and add a smidgen of pink gel food coloring.  Then I rolled it out pretty thin and cut it with small cookie cutters.  I only cut a couple of circles at a time to ensure it didn't dry out while I worked with it. 


I thinned the edges with a ball tool and put it in my very expensive flower former to dry a bit.  What?  You say that looks like an egg carton covered in tin foil?  Yes, well, I like to reduce costs when possible and recycle to save trees.  Flower formers aren't as important to me as things like tasty gum paste. 

After all the pieces had dried for a few hours I realized I hadn't left a pink circle to adhere the new petals to.  Whoops!  So I mixed up some black gum paste I would need for the flower center and cut a small circle.  (More on the awesome-ness of the black gum paste later.  Flexible royal icing anyone? Yeah, you wanna know!)

Using an equal mix of meringue powder and water as glue, I slowly adhered the petals to the black circle base.  I also inserted a clothe covered wire into the center so I would be able to place it on the side of the cake more easily.  After the center of the flower was glued on, I hand painted some white flower pistols black to make it appear more life like.  Next, my favorite part, I lightly painted on some dry luster dust to give some sparkle.  I love me some glitter!  I took some quick pictures and then let it dry. 
I was rather pleased.  It looked pretty.  I wanted to make some extras but I'd used all the pink gum paste I'd made.  The flower was so grand, it would suffice alone.  I could always make more later in the week.  I had plenty of time.  If only I had known then....

Shortly after, my husband asked me to do a dessert table for someone he knew, and I would need to do it all in three days!  It was an insane under taking, but I wanted the opportunity to network with other individuals so I couldn't pass it up.  But now I wouldn't have time for more flowers.  No biggie, I had already made the cake and frozen it.  I would just use the extra cupcakes from the bridal shower for the dessert table.  Easy again.  Piece of cake.  Speaking of cake, the church called.  We'd recently paid off our mortgage and we wanted to celebrate with a cake.  Could I make one in two days for about 100 people?  Of course.  How flattering you would even ask me!  Completely doable, or....

Not.  I did the whole dessert table and was still conscious on less than two hours of sleep in over two days.  Still needed to go home from that gig, and add the flower to the frosted cake.  Next I'd bake the church cake and frost it up.  No problem.  I pull the well dried anemone out.  I flipped it over and prepared the place it on the cake I where it.  That's when I noticed a teeny bit of wire exposed.  Can't have that, so I went spin some floral tape on it.  Can you see it coming?  Yeah, when I went to pick up the flower by the wire I discovered that it wasn't so secure.  The flower plummeted from the wire and onto the counter.  I was afraid it would land on the floor so with my Superman-like speed, I smashed it onto the counter space, cracking three petals off.  "NOOOOOO!!!!  WHY ME?  NO!"  I started shaking and practically hyperventilating.  My friend was literally on her way to get the cake.  This could not be my life! 

After my five minute meltdown, I realized this is life and it is my life.  I better toughen up.  This is why you make extras, because in the long run, it saves you time and heart attacks.  You can always use extra gum paste flowers.  They last for weeks.  But now what to do?  I can't place the flower on the side, so the top will have to do.  I don't have time to make more gum paste.  So I quickly dyed some buttercream pink that I had made the night before.  Carefully, I put the flower on the top side with a dollop of buttercream underneath.  Then I added the broken petals in discrete places to hide the jagged edges using the pink buttercream as glue.  I filled in any cracks with the buttercream and hoped it still looked pretty.  I'm not gonna lie, I was still on the verge of tears.
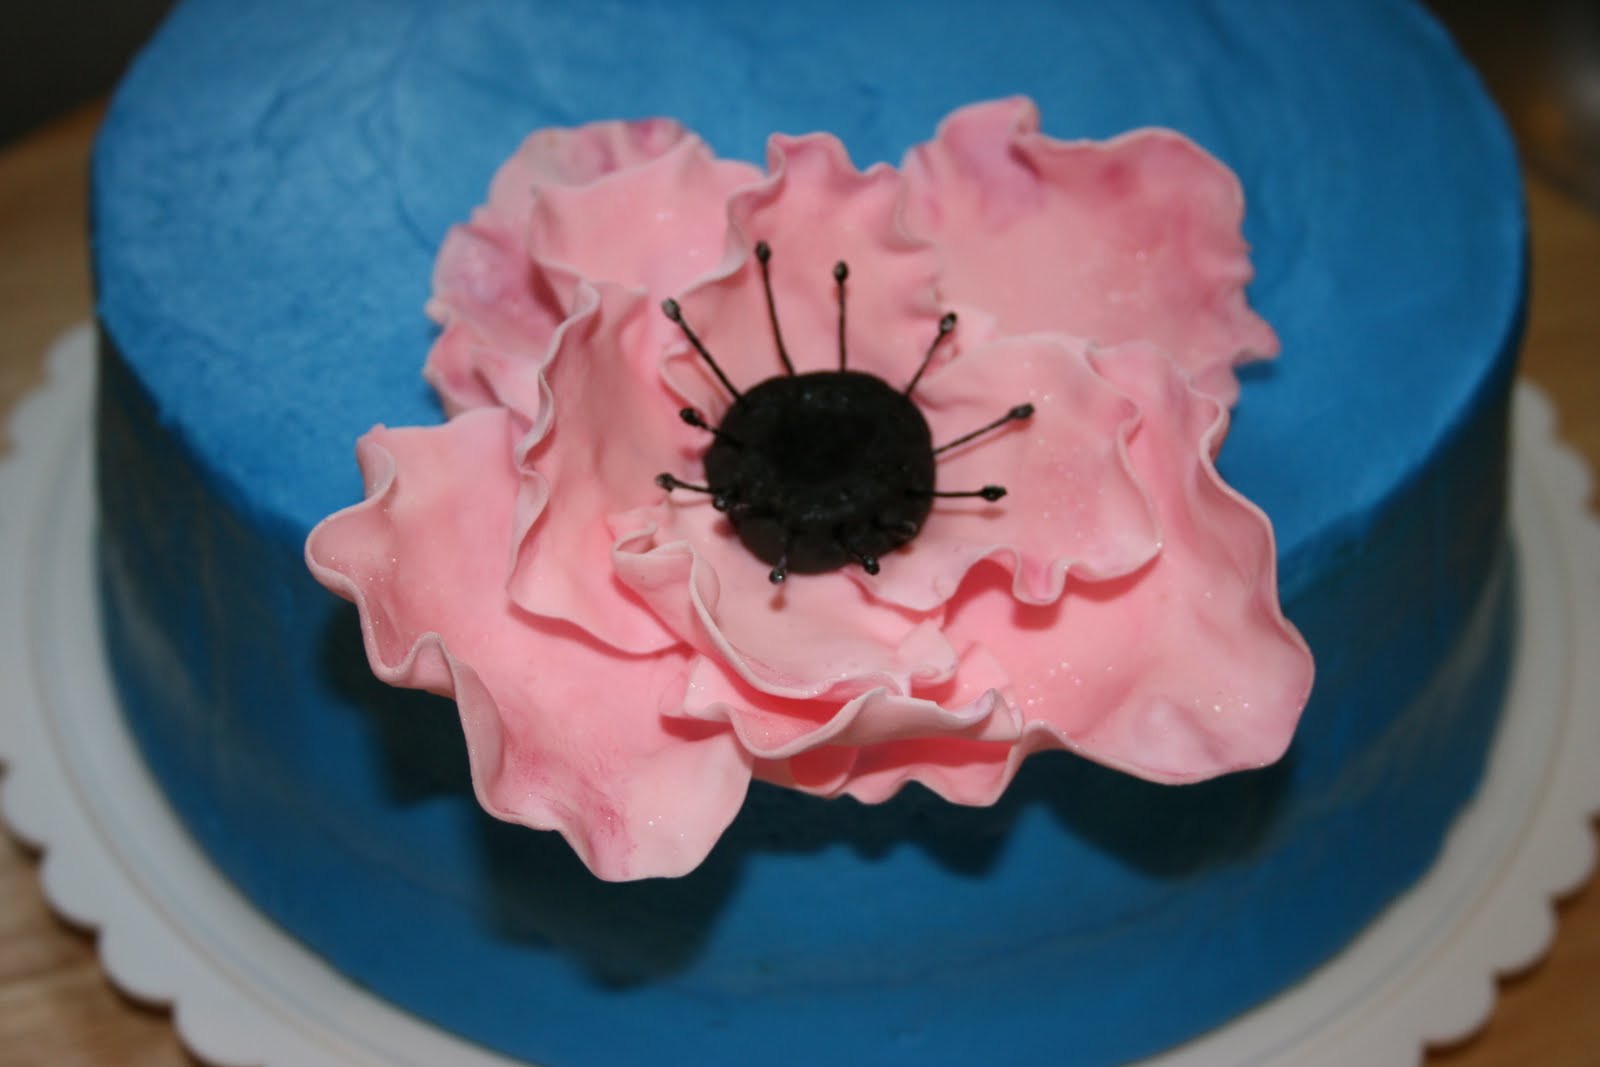
When my friend arrived, I told her.  Apologized.  And asked if she still wanted it.  She said she couldn't even tell it was messed up.  She loved it.  I hoped it tasted half as good as it looked.  Later that evening, as I made extra buttercream "just in case" for the church cake, she texted me the photo below and said, "It tasted amazing!"

All I can say is praise God.  Now time to do the church cake...

Sunday, May 22, 2011

Razorback Velvet Cake with Berries

My husband's work place has had some visitors from across the pond, Brits, this week. So we were supposed to go to a game night with some of my some of his work friends to visit with all the newbies.  I decided to make a very Southern dessert to take over there.  Red Velvet cake with cream cheese frosting.  This cake has just a bit of chocolate added to it to give it the velvety texture it's known for and is dyed a deep Razorback red.  It seemed an appropriate choice to share with the British.  But I'm not going to lie, I was tempted to make scones and Banoffee pie and ask them if it was anything like the originals.  Unfortunately, my Love was not feeling too hot.  We stayed in.  And regrettably, I had already made a second cake to take to church.  Twin cakes.  Still coming up with something to do with the second cake.

My recipe is adapted from here, but it tastes a little different the way I make it.

Ingredients:
2 1/4 cups sifted cake flour (sifted, then measured~you can make your own with 1/4 cup of cornstarch inside your 1 cup measuring cup, filled the rest of the way with flour.) 
3 tablespoons unsweetened cocoa powder
1 teaspoon baking powder
1 teaspoon baking soda
1/2 teaspoon salt
1 cup buttermilk (I made some with almond milk and a teaspoon of apple cider vinegar)
1 teaspoon apple vinegar  (even if you make your own buttermilk, add this too)
1 Tablespoon of vanilla extract
1 1/2 cups sugar
1/2 cup (1 stick) unsalted butter, room temperature
2 large eggs
1/4 cup of vegetable oil
Lots of Americolor Red until the batter is RED like an Arkansas razorback

Preheat oven to 350°F. Spray two 9-inch-diameter cake pans with baking spray. Sift sifted flour, cocoa powder, baking powder, baking soda, and salt into medium bowl. Whisk buttermilk, vinegar, and vanilla in small bowl to blend. Using electric mixer, beat sugar and butter in large bowl until well blended. Add eggs 1 at a time, beating until well blended after each addition. Beat in dry ingredients in 4 additions alternately with buttermilk mixture in 3 additions.  Add the red food coloring until the desired shade.  Think of the grooms cake in the movie Steel Magnolias.


Divide batter between prepared pans. Bake cakes until tester inserted into center comes out clean, about 22 (in an electric oven) minutes. Cool in pans on racks 10 minutes. Turn cakes out onto racks; cool completely.

Don't skimp on the sifting or you will end up with a heavy cake with clumps of cocoa powder in it. 

Make a batch of your favorite cream cheese frosting or vanilla buttercream.  I like the taste of the cream cheese frosting but I really don't like how mine isn't manipulatable like buttercream is so I guess I need to try some new recipes. 

Frost the cake per normal.  If you want extra complexity and beauty for your presentation, add some fresh berries to the middle and top of the cake.  This is also great for hiding frosting flaws as well as getting your daily dose of antioxidants!  Any berries you like are fine.  The original recipe calls for blueberries and raspberries, but you can use whatever you got the best deal on at your local farmers market.

On one cake, I took some of the crust I had cut from around the edge, crumbled it, and then patted it to the side of one of the cakes.  The other I added the berries to the bottom for a border.

I must say, very delicious indeed.

Tuesday, May 3, 2011

Teacher's Appreciation Day

God bless teachers!

Today is Teacher Appreciation Day.  I think almost everyone has been touched emotionally by a teacher in some way.  I've had several teachers who said some not so nice things to me or about me, and even they managed to make me a better student or person, if nothing more than to prove them wrong.  I've also had some really inspiring teachers over the years too.  Brave individuals who stood against what was wrong and instilled in us what was right.  No matter the teacher this is your day! 

I meant to write a tutorial on some cupcake cookie combos today, but alas, life got in the way and the sugar cookies aren't finished.  Maybe I'll get them all ready for the first day of school instead (naturally, I'll have to eat the ones I made now and redo them later--Whoops!).  I did manage to make some carrot cupcakes and some little fondant apples and worms (why are worms in apples associated with teachers?).  I'd like to dedicate them to my favorite teacher-in-training, Miss Putt.  One of my favorite people, in fact.  She has really worked hard to be an inspiration to the future minds of this nation.  I was going to drop these off for her to enjoy today at work, but she is at home trying to finish her thesis in order to be a real, live, grown-up teacher!
The cupcakes were leftover batter from a carrot cake made for a birthday.  If the top of the leveled carrot cake is any indicator, and I believe it is, of the inside of the carrot cupcakes, this is an awesome recipe.  
Look at all those chopped carrots!

He's smiling at you : D

So even if you don't have time to make something for the teachers in your life, maybe you could just drop them an sweet email or handwritten note, thanking them for all they do and all they put up with. 

Tuesday, April 12, 2011

Hungary for Mousse...bars

I meant to write so much more last week, but life got in the way.  This last week has been rough.  Meetings.  Discrimination.  Decisions.  Will I have the courage to stand up to it?  What's right is rarely popular.  I have never been a popular person as it is so it shouldn't be foreign to me.  But fear ripples through my viens, weakening my resolve.  I believe you must give credit where credit is due and not doing so would be plagerism--at least when it comes to writing papers.  Oh that I might have the cunning of a lioness and the voice of her roaring, golden maned mate.  I pray to do what is right.

I needed something to distract me and clear the soot from my soul.  So I baked.  I've long desired to try these Hungarian Mousse Bars from Epicurious.com.  Before you say it's too much work, just know they're divine.  Plus, you have me giving you tips!
I used Silpat rather than wax paper.  In hindsight, I'd rather have used the paper.  The delicate cakes are difficult to remove the heavy Silpat from.  If you mess up like I did, just mash it back down in the empty spots.  I also didn't have apricot jelly so I subed black raspberry.  Good decision.
One pan was Silpat, the other was this.  Both work equally well.
Jam layer in back, ganache layer in front.
 It's important to make sure you have STIFF peaks everytime the recipe says for stability.


Stiff peaks on the egg whites.

Stiff peaks on the whipped cream.


Several reviews stated that the mousse didn't set properly.  I had no problems.  I set the mousse bowl inside a bowl full of ice as suggested, however, I sprinkled a generous amount salt on the ice.  It acts as a cataylst for the reaction.  When I felt it was on th slow side still, I popped it in the fridge for about 5-10 minutes.  (My husband claimed this really did nothing.)
Set mousse.
Mousse spread across cake and jam layer.

Personally, I don't feel geletin is necessary for the whipped cream layer either.


They were very delicate when assembled so we (hubby helped) flipped them onto the bottom of another pan and pealed the wax paper off that way.  If you want them to look like the picture on Epicurious, you need to either use smaller pans or cut the cake layers in half and stack them on each other first, then proceed with the rest of assembly.
Melts in your mouth, not in your hand.  Well, a bit on your fingers.

Everyone who ate them, loved them.  I hope you do too! 

Tuesday, March 29, 2011

I Am Baker--Vertical Cake

Not too long ago I stumbled upon "I am baker", the blog.  I loved her vertical cake tutorial.  Mostly because I have an inappropriate obsession with French pastries.  Vertical cakes remind me very much of the beautiful designs seen on so many sophisticated cakes in patisserie shops.  I'd seen the Cake Boss do a checkered cake and it seemed more involved, but the vertical cake was a perfect compromise.  Naturally, I had to try it. 

Maybe, I should have a reason for making cake (silly, I know).  Well conviently, I knew someone have a birthday soon and our church does a weekly potluck.  Who better to force cake on than your church members and your friends?!  Most will be kind enough to compliment you, boosting your self esteem, and the rest will be honest with your mistakes without breaking your heart or refusing to order from you again. Perfect!  

So following Ms. Amanda's tutorial I made the cakes using my own recipes.  Here is what I learned.


I decided to make my husband's favorite recipe from scratch.  What I call Vanilla Nut, or Yellow cake from scratch.  I made it with almond milk, which I do often for us since we don't typically drink regular, cow milk.  It adds to the "nut" factor (I also put about 1/2 teaspoon of almond extract in it).  It's a typical scratch cake: cream butter and sugar, whisk dry ingredients, etc.


Notice in the picture above that I used "real" vanilla, rather than imitation.  I've noticed that imitation vanilla doesn't have as pure or as tasty of a flavor compared to its counterpart, at least in cakes.  If you aren't a cake snob or concerned about artificial flavor addititves and you want to save some cash, use imitation.  I'd wage to say no one, not even cake snobs would know the difference.

I baked the Vanilla Nut cake in two 9 inch pans.  While that baked I made a raspberry cake using the same recipe, but substituting raspberry flavoring for the vanilla and almond flavor.  Raspberry cake should be pink too, right?! 


When they finished baking they looked like this. 

My cakes were almost level, but they have a "skin" on them which I typically rub or peal off when they're cool.  It's a texture thing for me.  And I saw a French baker do it to his sponge cakes.

*Make sure you grease and flour your pans well and/or use wax or parchement paper in the bottom of you pans for easy release.  Also, smooth out the tops of the batter in the pans prior to baking to decrease domed tops.


Now, the original tutorial said to level them, stack them within 5 minutes, and put them in the freezer for several hours.  I believe this is to assist in adhering to one another.   However, I don't feel this is absolutely necessary as there are other ways to assure adherence.  Also, because I tried to get them out so fast, I forgot to run a knife along the edges on the raspberry cake.  When a cake is warm it is also more delicate and some of the sides longed to be with the pan more than they longed to be in my belly.  See where it's messed up?  No worries though, frosting covers a multitude of sins (on cake, not you, so don't cover yourself or your spouse in frosting.)

She also said to put simple syrup at various stages on the cakes.  I skipped this.  I was fearful for this particular recipe for it imparting too much sweetness, making it less stable for carving, and adding unnecessary calories.  Now, it's a flippin cake.  Calorie counting was kinda silly so forgive me.  In hindsight, the simple syrup was a necessity FOR the stability.  It would have adhered the pieces together and I could have let the cake cool more which is an absolute must for more delicate cakes.  (A box cake would have crumbled had it not cooled for more than 5 minutes being handled that much.)

I  froze the cakes overnight.  I cut the cakes the next morning in the circles with a VERY sharp knife, not a serated one to reduce crumbs.  I was very careful when I separted the layers because I knew I would have missed spots cutting the circles.


Alternate your cake colors or flavors.

  
Cut and separate the layers while the cake is still frozen.


I assembled the two cakes and refroze.  One cake I froze until the end of the week (wrapped up).  The other I "dirty frosted" and then took to a cake class to frost and begin decorations.  I actually then froze it, also for a week.
*This is when I should have simple syruped the cake a bit between the layers so they would have stuck together better when we cut it to eat it.


I used a basic buttercream recipe, not a smooth meringue buttercream.  In general, I don't have problems with this recipe, but as I've been making flowers I've noticed that this recipe will leave "feathered" flowers.  They might look more like they do in nature, but I dislike it very much so.  I mean, look at the original cake from Amanda.  It's breathtaking.  The roses are perfect.  So, if you attempt it, use a creamier buttercream, or heck, cheat and use canned frosting. 

The buttercream was a medium consistency, not quite thin.


My assortment of frosting spatulas.  The offset one is a must.


Dirty frosting crumb coats the cake.

The frosted bird cake prior to smoothing out.
If you are doing the roses all over your cake, it's not necessary to smooth the frosting because you won't see it anyway. 

 
For the birthday cake I put a buttercream blue bird on it. 
For the church cake I used my 1M tip as suggested and did the roses.  People seemed rather impressed with the roses, which was flattering considering it wasn't my idea and it was ridiculously easy to swirl frosting all over it.

Prior to airbrushing.  See the feathering?  ARG.
  
Finished!  Pink airbrush out of a can!  Thanks Wilton!


Little Birdy told me it was yummy!

Raspberry and Vanilla Nut vertical cake.
Here is the inside.  Cool, huh?  But see how the layers anen't snug?  I think the simple syrup would have fixed that.  It might not be necessary with a less dense cake but this one doesn't smoosh together.  Also, this one didn't fall apart as badly as the other for whatever reason.  We cut the other one up all at the same time and as people got thier pieces it separated a bit. 


Now you try.  People will think you are an absolute genius.